Converting a 2D image into a 3D model with exact measurements might sound tricky, but it’s something you can do with the right tools and technique. This skill is essential in many areas like CNC machining, product design, and assembly work. It saves time and helps turn ideas into real parts that fit perfectly. With SolidWorks and Image G, you get a powerful combo to make this process easier and more precise.
Understanding the Fundamentals of 2D to 3D Conversion
What Is 2D to 3D Modeling?
2D to 3D modeling means turning flat images into three-dimensional shapes. Imagine sketching a shape on paper and then making it into a real, solid object. This process is super useful when designing parts that need machining or fitting into assemblies.
Problems happen when conversions aren’t exact. Small mistakes can lead to parts that don’t fit or don’t work right. That’s why accuracy is key when converting 2D images into 3D models.
What Do You Need for Accurate Conversion?
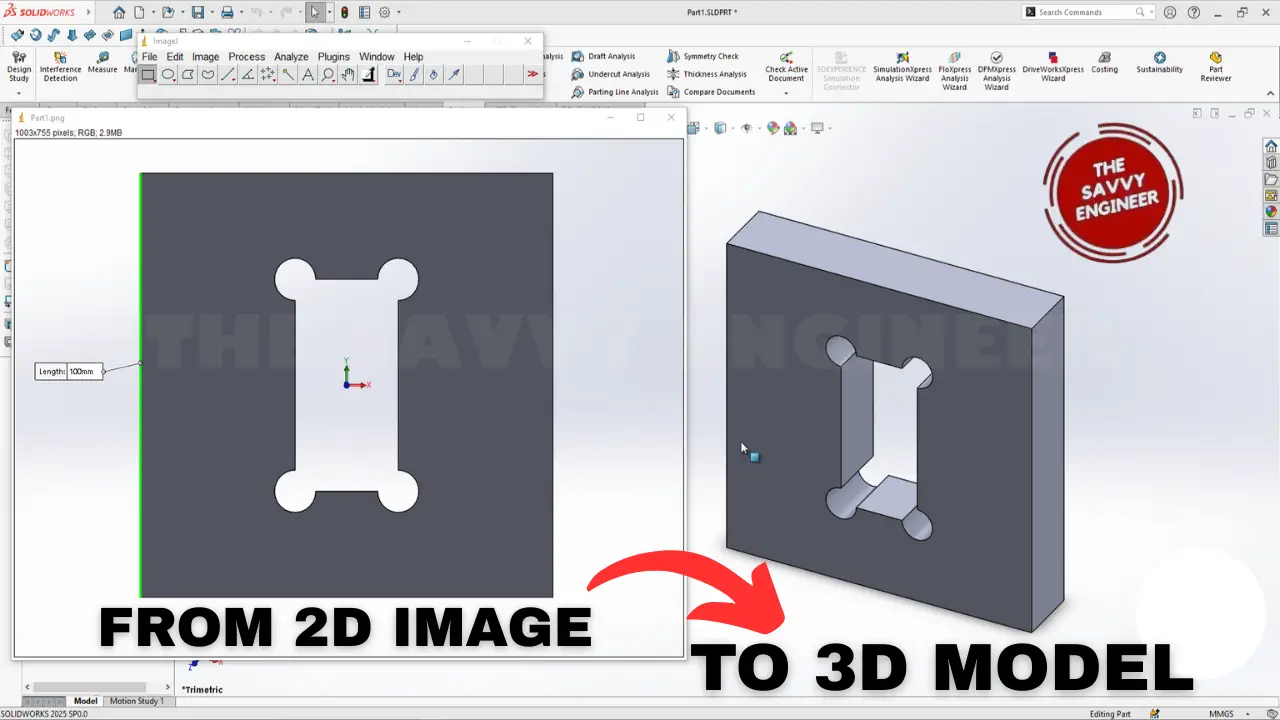
The main thing? One clear, real-world measurement. If someone gives you a picture and tells you that a certain edge is 100 mm long, it acts as your scale reference.
Other tips include using sharp images and making sure every measurement you take matches the real object. This way, your 3D model will be as precise as possible.
Why Is This Important?
You’ll need accurate 3D models for CNC machining, creating prototypes, or putting parts together in an assembly. No matter your goal, getting the measurements right from the start keeps your project on track.
Best Practices for Precise 3D Conversion
Double-Check Your Measurements
Always verify key dimensions with your measuring tool. Don’t rely on just one measurement — check several to ensure consistency.
Compare your SolidWorks dimensions with what you found in Image G regularly.
Break Down Complex Shapes
If the image shows complex parts, split them into simple sections. Build each one separately, then assemble later.
This approach makes hard shapes easier to model accurately.
Tips for Fast and Accurate Work
Keep your sketches organized. Name each feature clearly.
Use high-resolution images so you get sharp edges and clear points.
And when measuring, zoom in for precision.
Case Study: Turning an Engineering Part Into a CNC-Ready Model
Imagine you receive a 2D drawing of a mechanical bracket. Using this method, you import the image into SolidWorks, set the scale with a known distance, and measure the holes and edges.
Next, you sketch the shape, verify dimensions with Image G, and extrude it into a 3D model. Finally, you check all measurements again before sending it for CNC machining. The end result? A perfectly scaled, accurate part ready for production.
Conclusion
Converting 2D images into 3D models with exact dimensions is a valuable skill for engineers and designers. The secret? Proper scaling with a real-world measurement, careful measurement verification, and precise sketching. Using SolidWorks alongside Image G makes this process straightforward and reliable. Practice these steps to speed up your workflow and ensure your parts fit perfectly every time. Ready to take your modeling skills to the next level? Start practicing today and see the difference accurate models make in your projects.